Setting up a new home theater system can feel like assembling a puzzle without the picture on the box. One of the trickiest, yet most crucial, steps is correctly connecting your speakers to your AV receiver. Get it wrong, and your expensive new system might sound dull, distorted, or even remain silent. But don’t worry – understanding a few simple principles will have you enjoying rich, immersive sound in no time. This guide focuses on demystifying the process of connecting passive speakers to an AV receiver, the heart of most home theater setups.
Understanding Speaker Wire and Terminals
Before you even think about plugging anything in, let’s look at the humble speaker wire. This isn’t just any old cable; it’s specifically designed to carry electrical signals from your receiver to your speakers. Speaker wire typically consists of two insulated strands, one usually marked with a stripe, lettering, or a different color (like copper and silver) to indicate polarity – positive (+) and negative (-). Just like a battery, speakers and receivers have corresponding positive and negative terminals. Matching these consistently is vital for proper sound reproduction. If you connect them incorrectly, your speakers will be “out of phase,” which makes the sound thin and weak, especially bass.
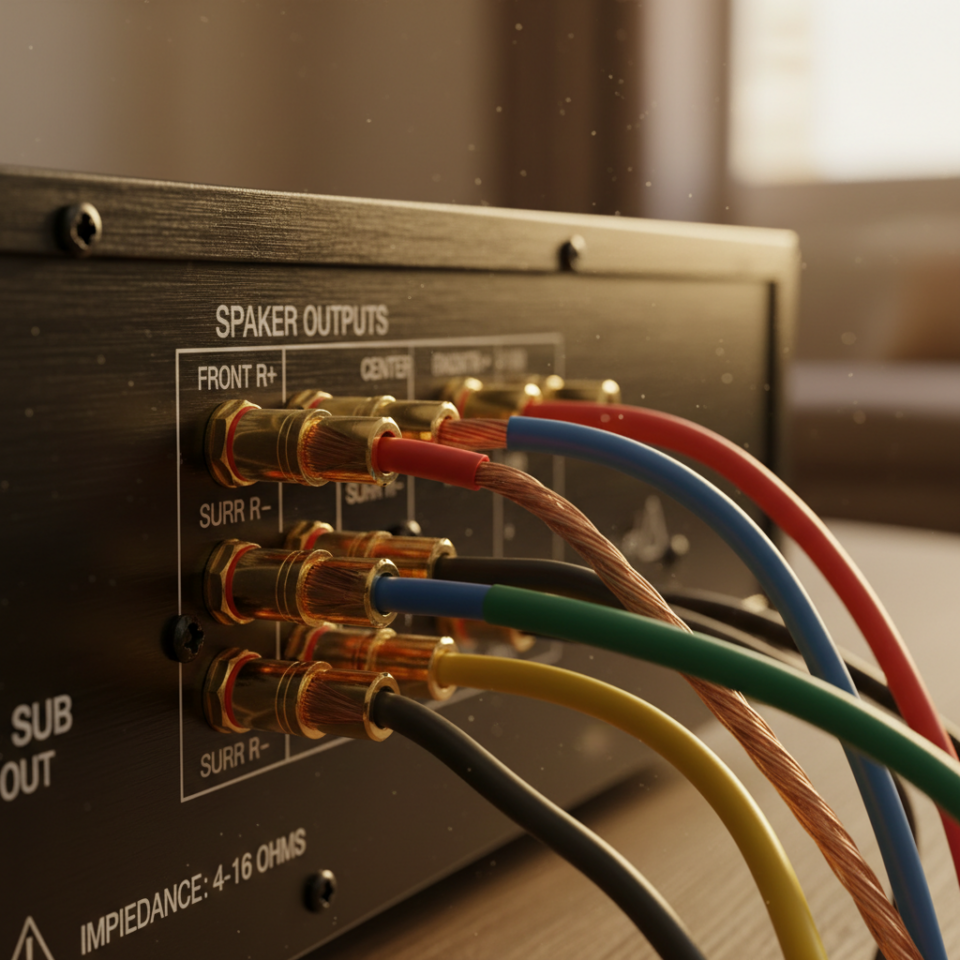
At the back of most passive speakers and AV receivers, you’ll find binding posts or spring clips. Binding posts are usually red for positive and black for negative, and you unscrew a cap, insert the bare wire (or a banana plug connector), and then tighten the cap. Spring clips are simpler: you press a tab, insert the wire, and release the tab. Always ensure a tight, secure connection; loose wires can lead to poor sound quality or even short circuits. For optimal performance, use a good quality speaker wire – thicker wire (lower gauge number) is generally better for longer runs, as it reduces signal loss.
The AV Receiver: Your System’s Central Hub
Your AV (Audio/Video) receiver is the command center of your home theater. It not only amplifies the audio signal to power your speakers but also manages all your video sources (like Blu-ray players, streaming sticks, and gaming consoles). On the back of your receiver, you’ll see clearly labeled speaker outputs: “Front Left,” “Front Right,” “Center,” “Surround Left,” “Surround Right,” and sometimes “Surround Back” or “Height Channels.” Each pair of terminals (red for positive, black for negative) corresponds to a specific speaker in your setup. The key is to match the speaker’s physical location with the receiver’s output label. For instance, the speaker positioned to the left of your TV should connect to the “Front Left” terminals on your receiver, ensuring a correct soundstage. Never connect an active (powered) speaker directly to the speaker outputs of an AV receiver, as these speakers have their own amplifiers. Active speakers are typically connected via RCA or XLR cables to the receiver’s pre-out connections.
Making the Connections: A Step-by-Step Guide
Here’s how to connect your speakers to your AV receiver, step-by-step, for a seamless setup:
- **Prepare Your Wire:** Measure and cut your speaker wire to the appropriate length for each speaker, adding a little extra slack. Strip about half an inch of insulation from each end of both strands of wire, being careful not to cut the fine copper strands. Twist the bare wire ends tightly to prevent stray strands from touching each other, which can cause a short circuit and damage your receiver.
- **Connect to Speakers First:** Starting with one speaker (e.g., your Front Left), identify its positive (+) and negative (-) terminals. Connect the marked wire strand to the positive terminal and the unmarked strand to the negative terminal. Ensure the connection is firm.
- **Connect to Receiver:** Now, take the other end of that same wire. Find the “Front Left” speaker terminals on your AV receiver. Connect the marked wire strand to the red (+) terminal and the unmarked strand to the black (-) terminal. Double-check that the positive wire from the speaker connects to the positive terminal on the receiver, and similarly for the negative.
- **Repeat for All Speakers:** Follow the same process for every speaker in your system (Front Right, Center, Surround Left, Surround Right, etc.), always maintaining consistent polarity. Once all speakers are connected, give a gentle tug on each wire at both the speaker and receiver ends to ensure they are securely fastened and won’t easily pull out.
After all connections are made, perform a quick visual check. If any positive wire from a speaker is connected to a negative terminal on the receiver, or vice versa, correct it before powering on your system. Once everything is correctly wired, you can proceed to power up your receiver and run its automatic speaker calibration system (if available), which fine-tunes the sound for your specific room and speaker placement. Enjoy your perfectly connected and sounding home theater!